
This comes from a staging and scenework workshop I was teaching a couple of weeks ago at one of our Monday improv classes.
The first bit also comes from workshops done with Adam Meggido and Dylan Emery, who I think originally did it with Ken Campbell.
For a while I’ve been thinking about what makes people look really ‘good’ on stage during impro. Sometimes people are hitting all the right impro notes, but there’s just a certain zing of confidence missing from performance. Volume and movement are helpful, but for me another major player is the use of space.
Adam Meggido and Dylan Emery taught me that the stage can be split into 9 squares, with each square already implying a certain status to the character standing in it. 1 is the highest status area on stage, 9 the lowest status:
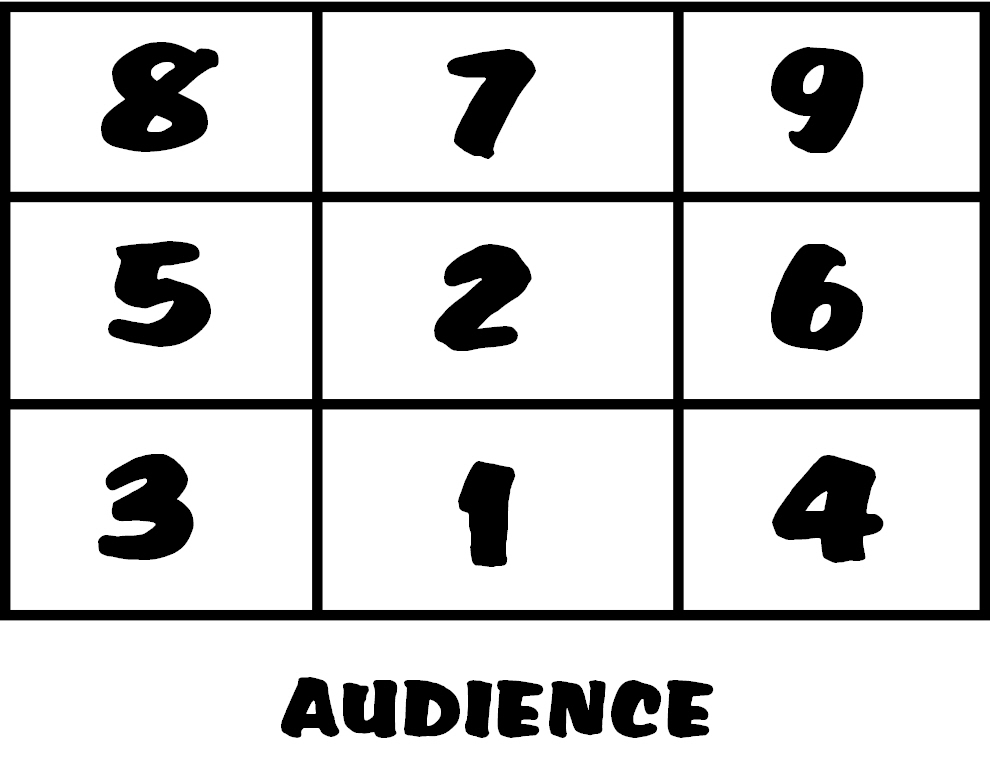
Central stage at the front implies the highest status. Apparently the audience’s left hand side of the stage is higher status as we read left to right.
When we were working with Adam recently he said that an improviser who is loosing confidence and has found themselves drifting back to the stage can deliberately walk to square 1 to raise in status and deliver a strong line that gets them back on track.
As a group you can deliberately use the space, covering each square you choose, to create something beautiful on stage.
Hoopla Modifications
I’ve found the above works well for a theatrical style impro show in a proper theatre space. However a lot of impro is fighting a bit of a losing battle when it comes to staging as it often takes place in spaces that aren’t perfect for theatre, like rooms above pubs, in corners of pubs, free fringe venues etc. The appearances of things like radiators on stage, posters, tatty paint, windows etc all serve to distract the audience and shrink the space.
We’re aiming to suspend the audience’s disbelief, welcome them into a space where anything can happen, and bring them into imaginary worlds that they see and believe. It’s quite hard to do this if most of the audience are thinking “what’s that fire extinguisher doing there?”
Also the audience in these alternative spaces aren’t aware what the performing space actually is, unless you show them. When they walk into a proper theatre there is a better distinction between audience and stage, and it’s pretty obvious what area the stage is. Areas of the stage don’t die in proper theatres just because nothing is happening in them, the space itself keeps them alive.
However in alternative venues we have to keep the space alive ourselves. If we perform all our scenes on one spot the space gradually shrinks around us until the audience just see two people in a room above a pub. However if we activate the space and keep it alive the audience start to experience theatre.
Another challenge in alternative venues, especially with people new to impro, is that the audience aren’t just seeing your space on stage as a character and staging choice, they are seeing it as a measurement of how nervous the improviser is.
In the diagram above if a scripted play features two people having a conversation together in square 9 we will interpret it as a deliberate choice, especially if it is helped by the surrounding props/scenery. However in a lot of impro we actually just interpret them as being scared of the audience, loosing confidence, and trying to get away.
Also in these sort of venues it’s quite hard to see all the actors all the time, due to non-raked seats combined with floor high stages. For these reasons it’s harder to imply depth, and even with people using the whole stage it can appear two dimensional.
There seem to be slightly different rules going on for these kind of spaces. So for these reasons we came up with a different map:

Fun Zone: I got this word from Oxford Comedy Deathmatch, and love it so much I now use it all the time. Your average improv scene is improved greatly by bringing it into The Fun Zone, especially towards the front of the Fun Zone. When improvisers get nervous they start to retreat to the back wall, or sides, and stay there. Get into the fun zone and whatever you’re doing will be more fun. We can all see you and hear you in the Fun Zone, and you don’t block anyone else. You don’t have to worry too much about height in the Fun Zone, just have fun.
However remember to activate the other zones too, with actions, grabbing props, looking at views, entrances and exits. Otherwise before you know it the performance space will shrink like cling film around you and before you know it you’re just a person in a room above a pub again, instead of the princess on top of a castle that you were at the start of the scene.
Back Zone: This can be a danger zone, as improvisers can drift there when nervous or stuck in their heads. It can be used deliberately though. In Music Box we use it as the area to do background dancing/clowning while someone is singing in the Fun Zone. You can also play props in the Back Zone to add depth. In Music Box we tend to grab a chair to stand on, so you can give height in a flat space. When acting I like to think of the Back Zone as having a time limit, like near the net in basketball, so that unless you have a good reason to be there you should get out.
If you want to draw on a blackboard, paint a picture, look out of a window and talk out of a view, try to put it on the fourth wall in the Front Zone rather than on the Back Zone wall.
Be aware of height in the Back Zone, you’ll have to be taller to be seen.
Front Zone: Good place to hang pictures in your scene, paint walls, write on black boards etc. By putting these things here rather than on the back wall the audience can see your beautiful face and feel like the action is for them. It’s also a good place to put props like kitchen sinks and operating tables, as other improvisers are then less likely to walk through them.
As a host I often deliberately walk along the length of the front zone before the show starts to get audience taking their feet and drinks off the stage and to signal where the performing space is.
If doing a scene in an outside setting you can still put props here, low down props work well.
While you’re having a dialogue with another improviser try referring to things on the fourth wall, picking them up, touching them, allowing them to inspire you.
Height wise it’s good to play low here, unless you’re really making a big statement as a character. Low characters looking up at high characters in the fun zone can add focus here.
Be aware that if you act the whole time in the front zone you might accidentally intimidate the audience, as you might be too loud, block their view of other actors, or even accidentally spit on them!
Returning to the Fun Zone like a Squash Player returns to the T seems quite effective, leaving the Front Zone free for putting props in or making bold statements/taking focus.
Be aware of height in the front zone, you might have to crouch if there are loads of people on stage.
Side Zones: Good places to activate when coming on stage with props, things on walls, objects, doors etc. Not great for staying in to act for too long as we’ll unbalance the stage. Good for going to get a prop you don’t expect and find inspiration. Good place to put yourself if you want to loose focus for a bit while someone else is in focus in the scene.
Corners: Corners can be very helpful in impro, so I’ve given them special prominence away from the back zone etc. By having two actors talk to each other across the corners (front corner to back to corner) note that the diagonal is brought to life and suddenly we signal to the audience that the whole stage has come to life.
Back corners can be good entrance points (think servant delivering message) and can have the effect of adding depth, especially if the other actors are towards the front on the other side. Front corners can be good heroic or bad guy entrance points.
Front corners can be great for playing little asides where two characters want to talk to each other without the other characters on stage listening.
Front corners can also be great for revealing secrets to the audience, or even talking direct to the audience Commedia Dell’Arte style.
Heights: In general it’s good to have an awareness that if you’re near the front of the stage you need to be lower down to stop blocking the people behind you, unless it’s a deliberate high status/high impact choice. Playing with heights and space can add loads of depth to the scene, and make it look super cool.
Exercises
Before you do these you can use masking tape to map out your stage map on the floor.
Experiencing the Space: Get two actors up. Get them to take any square each, just stood their neutrally and silent. Ask them how it feels. Ask the workshop what it looks like is happening. Experiment with turning them in different directions, making eye contact with each other, looking at audience, facing towards or away etc. Repeat and experiment with all the different stage positions. You’d be surprised how it already looks like something is happening.
Building Montages: Get six people off stage. Give them a suggestion of a location. They have to build a scene picture/montage of that location as a freeze frame within 5 seconds. Get them to be aware of the different areas of stage, and the different ways of using height and giving focus. Eye contact is also helpful, including across the diagonals.
Activating the Space and Entrance: Two actors, one off stage, one on stage. Give them a suggestion of a location, or nothing at all if they’re up for it. On stage actor activates the space by moving around each area, finding a prop in each area and doing some kind of common action in the fun zone. By going into each area they spread the possible performance space in the audiences eye. For instance a cook is chopping in the front of the fun zone, goes to the front zone to open some cupboards and get a tin, opens it in corner, buts it in bowl in fun zone, grabs apron they forgot from side zone.
The off stage actor makes an entrance when director gives thumbs up. Their objective is to name the relationship as soon as possible. They can bring in character and emotion.
As they play the scene out the director can help them by telling them areas of the stage to activate, and experiment with different uses of space, eye contact, distance from each other, and using things on the fourth wall.
Improvisers shouldn’t feel the need to stay next to each other when in dialogue, walking away from the other person, activating a different part of the stage, and grabbing a new action, can be a very powerful thing to do.
Often being physical and playing with the space and grabbing a prop can open up the performer and get them out of a rut. You don’t have to wait until you know why you’re going somewhere or doing something, just do it and justify it later.
Beginners find focussing on the local space and a common action at the start of a scene a very welcome distraction from trying to be funny.
Talk/Don’t Talk: Two actors start on stage. They are given a location. They start in silence and don’t talk until director says so. In this time they activate the different spaces on stage, find different objects, and establish an emotional connection. Once they are allowed to talk they alternate between talk/don’t talk whenever the director says. This encourages them to activate the space and keep it alive, and discover bolder physical offers, rather than getting sucked in to a talking heads dialogue.
Lots of love,
Improv classes and shows
www.HooplaImpro.com